Introduction
Gutter installation is the process of fitting a roof drainage system that directs rainwater away from a building’s roof, walls, and foundation. A properly installed gutter system prevents water damage, soil erosion, damp walls, and structural weakening.
In this guide, you will learn how to install gutters step by step, including tools required, slope calculation, fixing brackets, sealing joints, and proper maintenance.
1. Tools and Materials for Gutter Installation
To install a gutter system correctly, prepare the following:
Materials
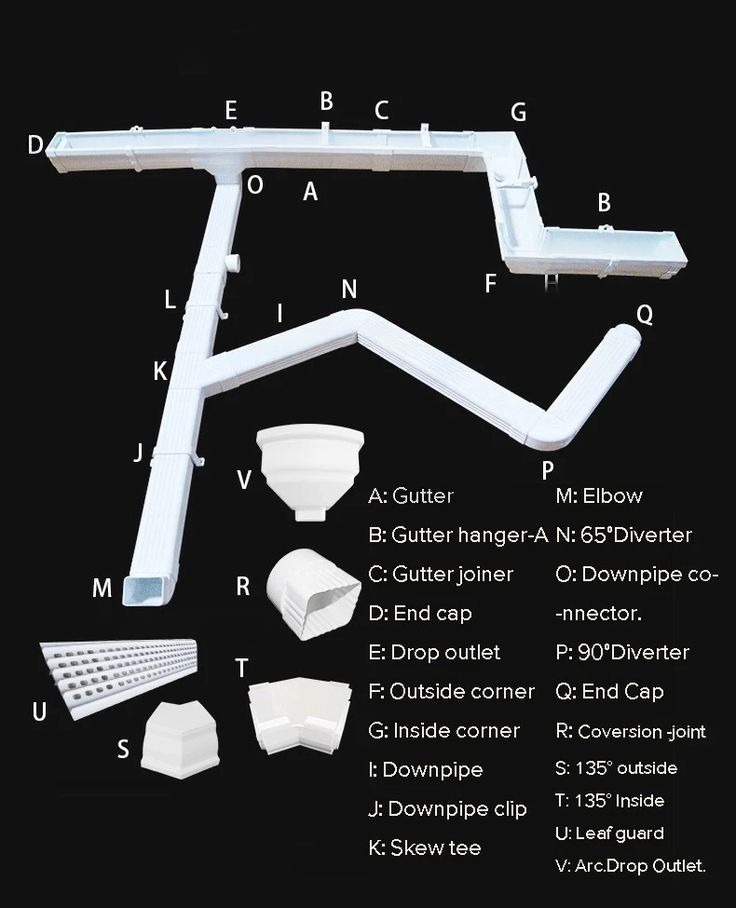
- Gutters (PVC, aluminum, or steel)
- Downspouts (pipes)
- Gutter hangers/brackets
- End caps
- Connectors and elbows
- Waterproof sealant (silicone)
Tools
- Measuring tape
- Spirit level
- Chalk line
- Drill and screws
- Ladder
- Tin snips or hacksaw
Using the correct materials improves durability and reduces long-term maintenance costs.
2. Planning the Gutter System Layout
Proper planning improves water flow efficiency and prevents installation errors.
- Measure total roof edge length
- Identify downspout positions (corners or every 10–15 meters)
- Plan water flow direction
- Ensure discharge points lead away from the foundation
📌 Best Practice: Always plan the full drainage route before installation begins.
3. Creating the Correct Gutter Slope (Critical Step)
A gutter must be slightly sloped to allow water flow.
For gutter installation:
- High point: start of roofline
- Low point: downspout location
📏 Recommended slope:
- 5mm drop per 1 meter length
This ensures gravity-driven water flow toward drainage outlets.
4. Installing Gutter Brackets
- Mark bracket positions along slope line
- Space brackets every 600mm–900mm
- Fix securely using screws and wall plugs
- Ensure all brackets follow the slope line exactly
🔧 Strong bracket installation prevents sagging during heavy rainfall.
5. Cutting and Assembling Gutters
- Measure and cut gutter sections accurately
- Join sections using connectors
- Apply waterproof sealant at joints
- Install end caps securely
💧 Ensure all joints are watertight to prevent leaks.
6. Fixing Gutters to the Roofline
- Place gutters into brackets
- Lock or screw them into position
- Check alignment and slope consistency
⚠️ Avoid over-tightening to allow for thermal expansion.
7. Installing Downspouts (Drainage Pipes)
- Attach elbows to connect gutters to vertical pipes
- Secure pipes using wall brackets
- Extend downspouts away from building foundation
💡 Proper drainage prevents foundation cracking and flooding.
8. Sealing the Entire System
Apply waterproof sealant to:
- All joints
- End caps
- Downspout connections
This step is essential for preventing leaks during heavy rain.
9. Testing the Gutter System
After installation:
- Run water through the system
- Check for leaks or overflow
- Confirm smooth flow to downspouts
✔ Fix any weak joints immediately.
10. Maintenance Tips for Long-Term Performance
To keep gutters functioning properly:
- Clean every 3–6 months
- Remove leaves and debris
- Check for rust, cracks, or loose brackets
- Reapply sealant when needed
Regular maintenance extends system lifespan significantly.